Study Hall: Spurs stymie Celtics with Manu, mid-rangers and more
Here’s how the Spurs took down the league-leading Celtics on Friday.
I’d be remiss if I didn’t start the same way both halves ended: with Manu. The last Study Hall column extolled the virtues of “The Ginobili Effect.” Namely, that when Manu Ginobili is on the court, the Spurs share the ball better and assist on a greater percentage of their buckets. The same concept held true Friday night in San Antonio’s 105-102 home win over the Boston Celtics. Ginobili played half the game — right at 24 minutes — and when he was on the court the Spurs assisted on 52.6% of their made field goals. To be clear, that is not a very high percentage. It would rank 27th in the league, and it is significantly below their season average of 60.6%, a top-five league rate. However, when Ginobili sat, that number cratered to just 31.6%, a rate that wouldn’t even sniff Portland’s league-lowest 48.6%.
So, that prompts the question, how were the Spurs, who had a league-average offense coming into the game, able to score so effectively against the NBA’s top-rated defense? The answer is two-fold. First, they were able to get to the free throw line at a much higher rate than their season average, while not allowing Boston to get to the line. The Spurs are perennially one of the best teams at not fouling, so that’s no surprise. But, heading into this game, San Antonio ranked just 20th in free throw attempt rate at 24.4%. On Friday, their free throw attempt rate was 29.6%, a number that would rank third in the league.
The Spurs were able to take advantage of Boston’s relatively thin front court, so guys like LaMarcus Aldridge, Rudy Gay and Pau Gasol were able to be aggressive and draw fouls. Plays like this surprisingly explosive Aldridge drive helped San Antonio weather the first quarter Kyrie Irving storm:
Also, as noted in Colton Chumbley’s article, What we learned from the Spurs’ narrow win over the Celtics, Ginobili was able to bait an overly aggressive Marcus Smart into two fourth quarter fouls, leading to four huge free throws.
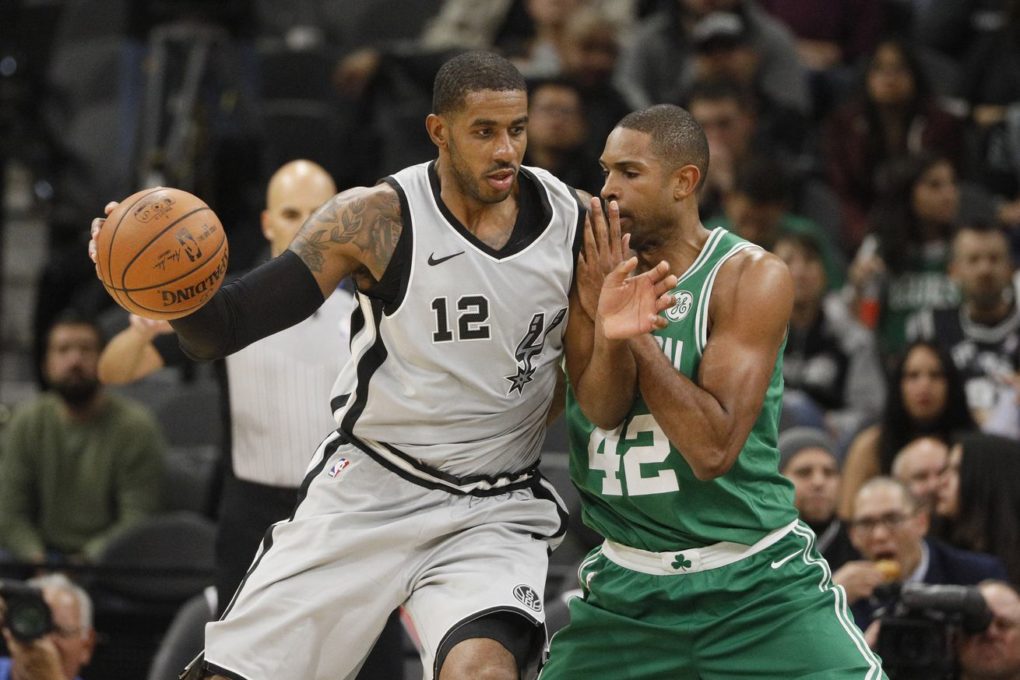
The second reason for the Spurs’ offensive success on Friday was less analytically friendly: they simply made a much higher percentage of their floater-range and mid-range jump shots than average (floater-range is the name for shots within the paint, but outside the restricted area). Heading into this game, the Spurs were taking 13 floater-range shots per game and making 42% of them. They were also taking 21 mid-rangers per game and connecting on 39% of those. On Friday, per NBA.com, San Antonio went 4-of-6 (67%) from floater-range and 14-of-29 (48.3%) from mid-range! Some of that was Rudy Gay, who went 3-of-3 on his post up attempts. But, much of it can be attributed to LaMarcus Aldridge’s brilliance in the post, where he went 6-of-10 and seemed unstoppable at times.
Al Horford, one of the best defenders in the league, was utterly helpless. Not all of Aldridge’s makes would be considered “great looks,” but he just found a way to put the ball in the basket:
Despite Aldridge beating Horford time and again, the Celtics opted not to double team him on what ended up being the second-biggest shot of the game.
Aldridge was able to back down Horford and make sure that he got a close look at the rim. Those types of shots lead to sustainable, reliable offense and San Antonio should continue to be aggressive in finding those looks. However, the Spurs also hit an extraordinary percentage of their mid-range looks, and that type of offense has yielded just average offensive results over the course of the season, so far. Against other top-tier defenses, the Spurs will hopefully look to generate more open threes and shots at the rim. Fortunately, settling for mid-rangers didn’t result in fewer free throw attempts this time around.
San Antonio’s defense continues to be consistently elite, so any night when they’re hitting from mid-range, they can feasibly beat anybody, even the team with the league’s best record. It just takes a little Manu magic to happen:
Spurs Shot Chart
/cdn.vox-cdn.com/uploads/chorus_asset/file/9841163/Screen_Shot_2017_12_09_at_4.21.00_PM.png)
Celtics Shot Chart
/cdn.vox-cdn.com/uploads/chorus_asset/file/9841167/Screen_Shot_2017_12_09_at_4.21.29_PM.png)
Four Factors
/cdn.vox-cdn.com/uploads/chorus_asset/file/9841279/Screen_Shot_2017_12_09_at_4.58.50_PM.png)
Team Stats
/cdn.vox-cdn.com/uploads/chorus_asset/file/9841283/Screen_Shot_2017_12_09_at_4.59.33_PM.png)
/cdn.vox-cdn.com/uploads/chorus_asset/file/9841289/Screen_Shot_2017_12_09_at_5.00.10_PM.png)
Source: Pounding The Rock