Guide: How To Transfer Screenshots And Videos From Switch To A Smartphone, PC Or Mac
 Nintendo Life
The release of Nintendo Switch update 11.0.0 brings with it various tweaks and additional functionality to the Switch and Switch Lite’s base firmware, including the ability to transfer screenshots from your console to a smartphone or PC. Previously, it was possible to upload up to four screenshots at a time to Twitter or save them to your internal Micro SD card, power off your Switch and move the card to a PC to copy your precious captured gaming memories.
More convenient options for transferring screenshots and videos from your Nintendo Switch to another device — be it a smart device, PC, or Mac — are now available and we’ll show you how in this guide.
Skip to the method you desire from the contents below and we’ll take you through the Switch image and video transfer process.
Nintendo Switch Screenshot Transfer Guide
For the smart device option it doesn’t matter if it’s a phone or a tablet, or an Android or iOS-based device — the process is the same. With that in mind, let’s smart with those devices, shall we?…
Send Images and Videos to Smart Devices from a Nintendo Switch
You can transfer up to ten images and one video capture to your smart device at once using the in-built system that came with update 11.0.0., and obviously you’ll need to have downloaded that update.
- To check which version you’re running, tap ‘System Settings’, scroll down to ‘System’ at the bottom and look at the version number beneath ‘System Update’ on the top right — if it’s it’s lower than version 11.0.0, download the latest firmware.
You will need:
- A Nintendo Switch or Switch Lite with some images or videos captured
- A smart device (a phone or tablet, or a flashy fridge perhaps…)
1. From your Switch’s Home Menu — in docked or handheld mode — simply navigate to the Album icon underneath your games collection and press the ‘A’ Button. Navigate to the screenshot or video that you want to transfer and press the ‘A’ Button. We’ve gone for this rather fetching example from Breath of the Wild, because why not?
2. Press ‘A’ again to bring up a menu on the left hand side with additional options. Highlight ‘Send to Smart Device’ option and press ‘A’. You’ll be prompted as to whether you want to send an individual screenshot or multiple (or ‘Mutliple’ in the initial release — version 11.0.1 is waiting in the wings, we’re sure). We’ll cover an individual screenshot first and then move onto multiple screenshots, and finally videos.
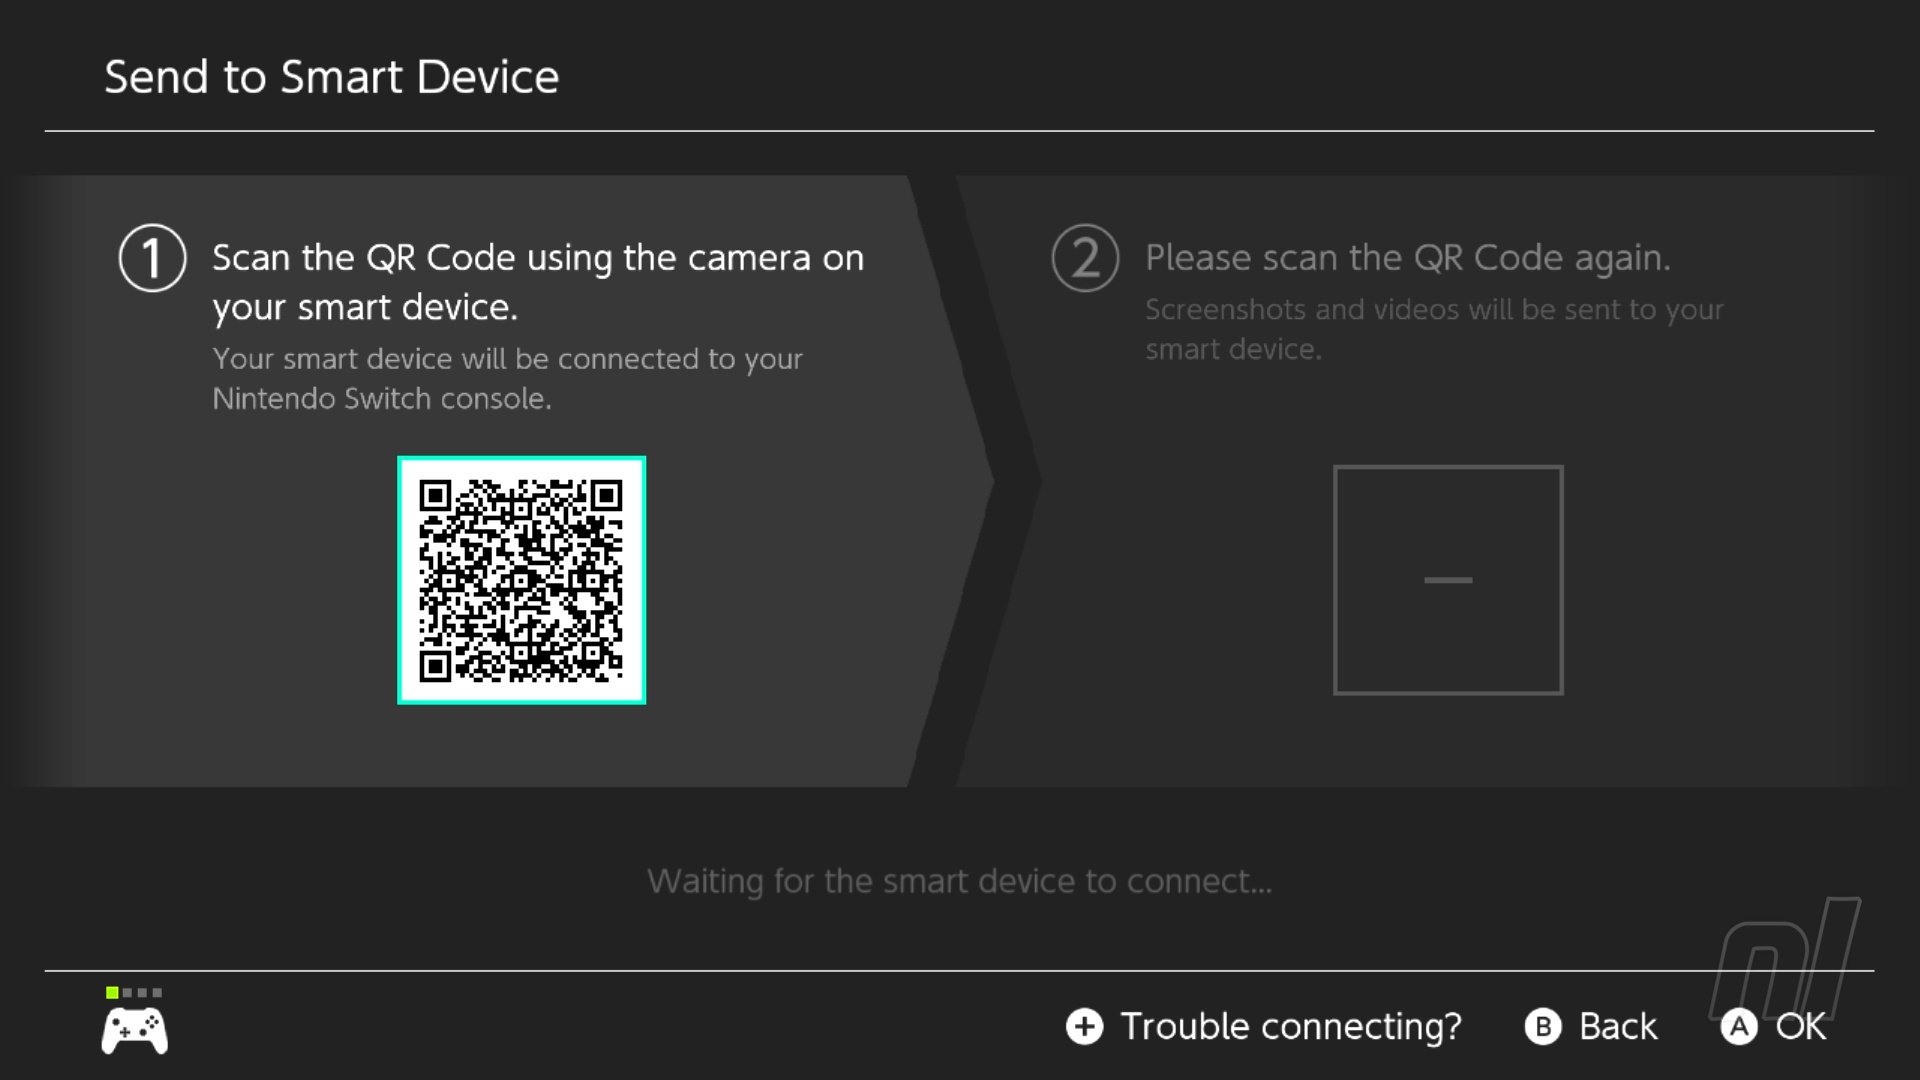
3. Select ‘Send Individually’ and you’ll be presented with a QR code that you need to scan using your smart device’s camera. Depending on your device, you may be able to scan this with your stock camera/QR app or you may have to download a QR Scanner App from your appropriate app store. There’s plenty about and they all do pretty much the same thing, so just go with a well-rated one.
 Nintendo Life
4. Scan the QR code with your device’s camera and you’ll be prompted to connect to a hotspot Wi-Fi network broadcast by your Switch console named “switch_something“. Don’t worry, this is what’s supposed to happen and it’s perfectly safe; further information about what this means is available at the bottom of the screen should you wish to know more.
5. Join the network and your Switch will then present a second QR code for you to scan. Do so and you’ll be taken to a webpage within your default browser, such as Safari or Chrome. If you can’t scan it for whatever reason, you can also simply type in ‘192.168.0.1/index.html’ in your device’s web browser.
6. From here you should see your screenshot on your device, simply tap it, and then tap and hold to present the option to download it, although this step may differ slightly depending on your specific device (as noted on the screen itself).
7. When you’re done, simply highlight ‘End’ on your Nintendo Switch to finish the process. Your smart device will be disconnected from the network your Switch created, and your Switch will return to its Album. You can now press the Home Button to return to the Home Menu.
For multiple screenshots the process is identical, except that when you load the page up to 10 screenshots will be present for you to download, which you will need to do one at a time.
For videos the process is also identical up until you view the webpage. This time you will be presented with the single video with the ability to watch it. Beneath the embedded video will be the option to download it; simply tap that link and the download will begin. Easy!
Send Images and Videos to a PC or Mac from a Nintendo Switch
If you’re champing at the bit to transfer more than 10 screenshots and/or videos, you can send them directly to your computer via a simple (if slightly hidden) process.
You will need:
- A Nintendo Switch or Switch Lite with some images or videos captured
- A PC or Mac
- A USB-A to USB-C or USB-C to USB-C cable
1. From your Switch’s Home Menu, navigate to the System Settings icon underneath your games collection and press the ‘A’ button. From this menu you need to scroll the left hand menu down until you highlight the ‘Data Management’ option. Navigate right and scroll down until you highlight ‘Manage Screenshots and Videos’, then press ‘A’.
2. From here, navigate down to the ‘Copy to PC via USB Connection’ option and select it with ‘A’. Your Switch will prompt you to connect your Switch to your PC (or Mac) using a USB cable. It’s good advice, do it.
3. You’ll need a cable to connect the two machines. If you have a Pro Controller, the cable that came with that is absolutely ideal, although any standard USB-A to USB-C should be up to the task (Nintendo itself has the following to say: A USB charging cable [model HAC-010] or a USB-IF certified USB cable that supports data transfer is required to connect to a computer). Some more modern machines may not even have a USB-A port, and so in this instance you’ll need a USB-C to USB-C cable, or an appropriate adapter.
Whatever your situation, a cable must go from your PC or Mac to this port on your Switch — and only the port on the Switch itself. As noted in the ‘Troubleshoot’ section, this transfer won’t work by connecting to your docked Switch to your computer via the dock.
 Nintendo Life
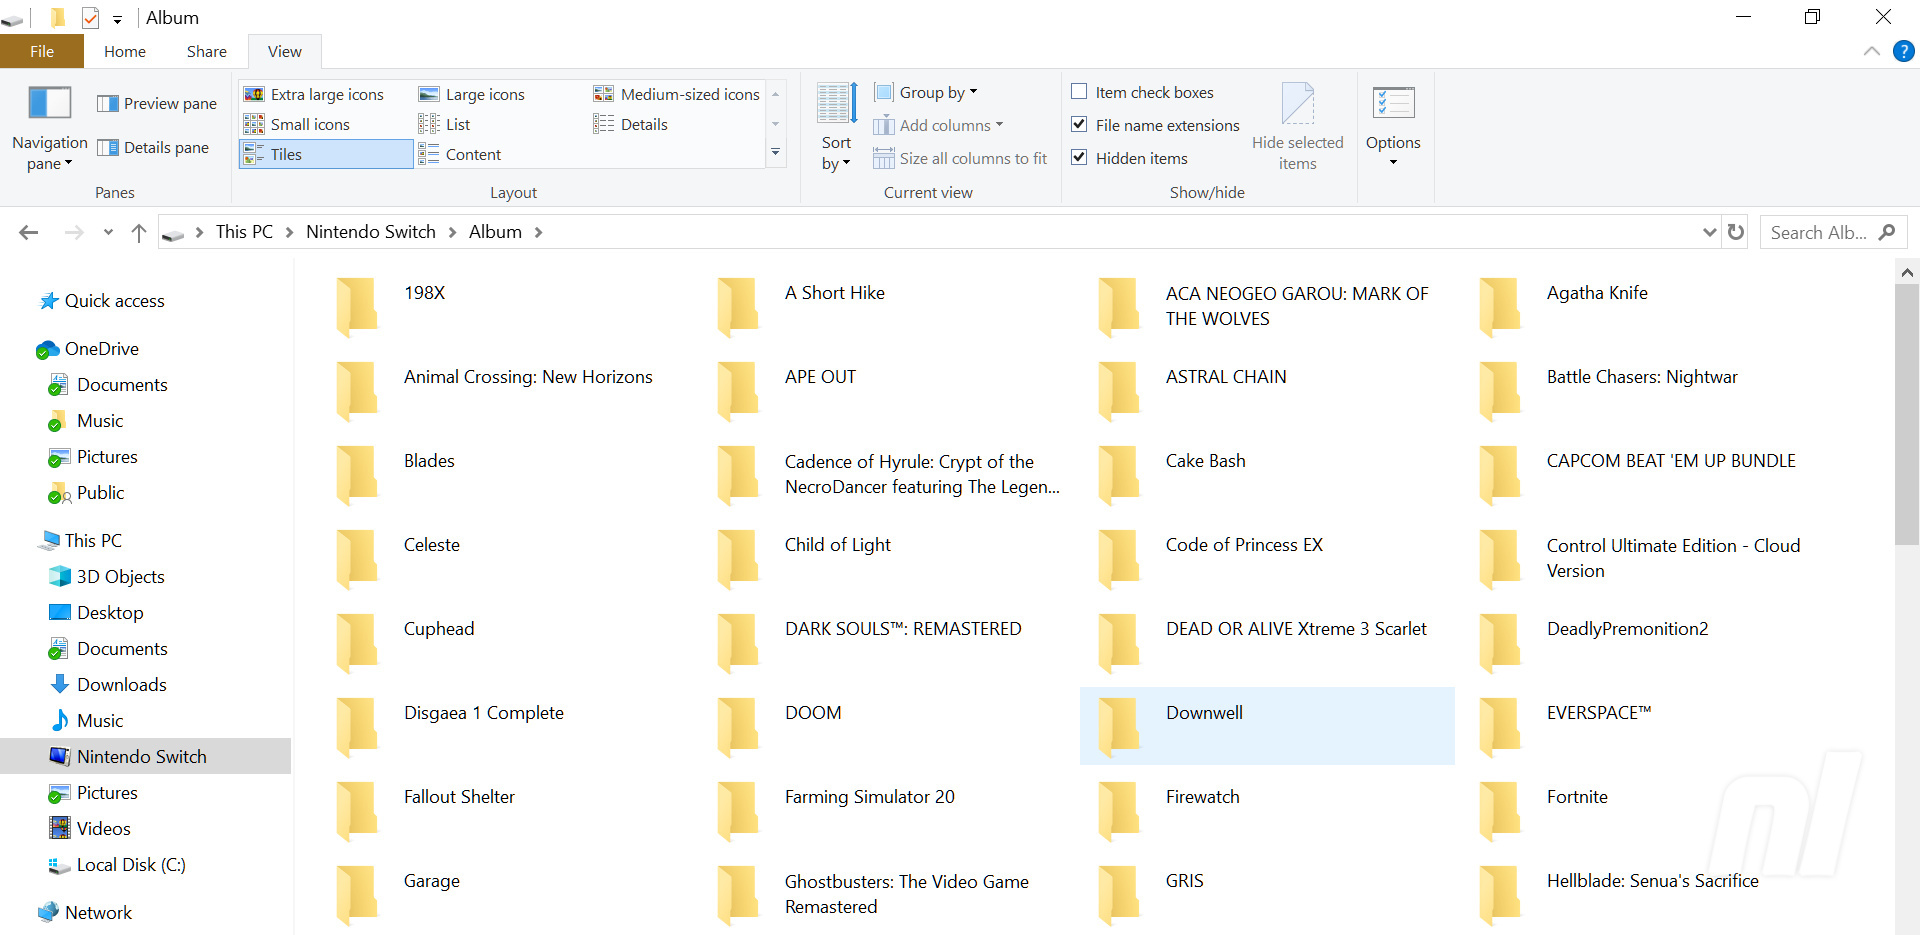
4. If you’re using a PC, your Switch should show up in Explorer as a ‘Nintendo Switch’ or a camera within ‘This PC’. Navigate through it like it were any other removable drive, and now you’re free to view and copy as many images or videos as you like using Windows’ native systems.
 Nintendo Life
5. Once you’re done, simply highlight the option on your Switch saying ‘Disconnect’ and press the ‘A’ button to, well, disconnect. You can tap it on the touchscreen if you prefer. That’s it — you’re done!
Note for Mac Users
If you’re more Mac-orientated, you’re going to need additional software because it’s 1997, apparently. There is an official Android File Transfer app that you can download from the Android website, and whilst this does work and will let you view and download all old your screenshots and videos, it does not provide previews of any kind, so it can be very tough to know exactly what file is what.
In this instance we used the free version of an app called MacDroid, which allows you to view the files on your Switch using the native Finder system of MacOS. It is unofficial, so download and use it at your own risk, but we suffered no issues and found it to be significantly more straightforward than the official option.
Whichever machine you’re using, make sure you disconnect via that ‘Disconnect’ option on your Switch.
So, you should have everything you need to know right there, but we do have some additional notes to hopefully provide answers to your burning questions.
Can I connect my Switch directly to my Smartphone or Smart device?
It appears not. We did try connecting the Switch to several Android phones via a USB-C to USB-C cable, but none of them would recognise it properly. One even had the gall to charge its battery via our delicious Nintendo console. Rude.
Can I connect my docked Switch to my PC or Mac?
As we mentioned above, this is not possible. We did try to connect a docked Switch to a computer using both a USB-A to USB-C cable and a USB-A to USB-A cable, which is a thing that actually exists that we have zero use for these days. This sadly does not work — the Switch simply didn’t recognise that it had been connected to another machine.
Does this Switch transfer work with Linux?
We thought about Linux as well, so we baked up a Raspberry OS Micro SD Card, slapped it in a Raspberry Pi Zero and it worked without issue! We weren’t able to view the images directly, we had to copy them over to the Pi in order to view them or do anything with them, but that wasn’t an issue, and moreover we were impressed at how well the videos played back on what is literally a £5 computer running a GUI. The audio… well, let’s not talk about the audio. Otherwise, we were impressed.
Do I need to scan the QR code every time, or can I just connect to the same Switch hotspot network?
Using our brains and noticing that the Switch was essentially creating its own WiFi hotspot connection for the smart device transfer, we wondered if we needed to bother with the first QR code and could instead just reconnect to the network on our phones. Annoyingly (although probably sensibly from a security perspective) the Switch generates a new WPA password each time, so no dice on that front.
Remember, if you run into any problems, Nintendo’s Support website is always available.
 © Nintendo
And that about sums it up! Once you’ve done either of the processes once it’s super easy to repeat and you’ll never again have use for this lovingly-created guide. That’s okay — that’s the destiny of any good guide. Don’t look back, lovely people!